Ubibot logo and name

FAQ

Answers to frequently asked questions

Data Logger Devices

There are two ways to obtain the MAC address:

  1. Login to https://console.ubibot.com and lookup the MAC address from the portal (Data Warehouse->MAC address lookup).
  2. Download and install the PC tools to read the MAC address from the device: https://www.ubibot.com/manuals/2001/pc-tools
  3. In the near future we’ll be adding the MAC address in the ‘Network’ field so it’s easy to find.

The mini-ports and the micro-ports cannot work at the same time.

External power supply can be connected to the USB mini port or the USB micro port.

The external DS18B20 temperature sensor must be connected to the micro USB port.

If you need a temperature sensor and a micro-USB power supply at the same time, you need the micro-USB splitter.

  1. The initial WiFi setup procedure for the device will may cause the MCU (Microprogrammed Control Unit) temperature to go up significantly depending on how long the WiFi setup goes, thus the temperature sensor will have a higher reading as the internal temperature does get higher than outside of the device. Also holding the device during the setup process can also increase the overall temperature of the device. After the initial setup, normally after 30 minutes, the device only awakes on sync and sampling cycles that will not cause this problem any more.
  2. If you use Micro USB to power the device, it will automatically enter USB connection mode, in which case the device’s MCU keeps on working for receiving PC command for the first 15 minutes. The internal temperature of the device will go up significantly. After the first 15 minutes, the device will quit the USB connection mode, MCU will go back to sleep again. Therefore, If you have just plugged in your device to the USB power source, please wait about 45 minutes for the device to be fully recovered to the environment temperature.
  3. If the data sync frequency is set too high, such as 1 minute, it also increases the temperature internally. The default frequency is 15 minutes. We notice you are currently setting this to 1 minute. We recommend to set the sync frequency to a value higher than 10 minutes or use external temperature probe that we offer.
  4. If you are concerned with the internal temperature sensor reading affected by the MCU, you can purchase our external temperature probe that can be attached to the device through micro-usb port. The external temperature probe (DS18B20) is waterproof and designed to operate in extreme conditions (-55ºC to 125ºC).
  5. If after a few hours, your device is still not reading correctly, please contact our support team.

All our devices have a large built-in memory and can store over 300,000 sensor records. These records are synced to our UbiBot ® IoT Platform and old records can then be over-written.

All our devices are lightweight and designed for easy wall mounting using the provided bracket, mounting holes or sticky pads. The WS1 Pro also comes with a stand to allow it to be placed on any surface.

  1. The device may temporarily show inaccurate temperatures during and after initial WiFi setup. The setup process involves heavy WiFi usage that increases the internal temperature of the device. It may take 15- 30 minutes for the unit to equilibrate with its environment after initial setup.
  1. External temperatures may warm the device including: Holding the device in your hand, or placing the device on a warm surface or in direct sunlight.
  1. If you use Micro-USB to power the device, the device will be running the USB connection mode for the first 15 minutes that may increase the internal temperature of the device. If you have just plugged in your device to the USB power source, please wait about 30-45 minutes for the device to leave the USB connection mode and equilibrate with its environment.
  1. If the data syncing frequency is set too high, such as 1 minute, the frequent WiFi usage may increase the internal temperature of the device. The default sync frequency is 15 minutes. We recommend to set the sync frequency to a value higher than 10 minutes.
  1. If you are concerned with the internal temperature sensor reading affected by the WiFi usage, you can purchase our external temperature probe that can be attached to the device via Micro-USB port. The external temperature probe (DS18B20) is waterproof and designed to operate in extreme conditions (-55ºC to 125ºC).
  2. If after a few hours, your device is still not reading correctly, please contact our support team.

A new device always defaults to WiFi setup mode (indicator flashing alternate red and green). This is also the case if the device has just been reset to factory defaults.

Probes

When you use the WS1 Pro device and connect the TH30S-B external probe, you typically navigate to the Settings page to activate the RS485 button first. You only need to activate the RS485 button when you have a single probe connected. If you activate other buttons, such as an external RS485 probe, the data on the device screen will flash automatically.

Thus, activate the corresponding button only for the probe you are using.

Tips: For TH30S-B and Soil probe, they can only be connected to the bottom USB port (USB2)on WS1 Pro device. WS1 device doesn’t support them.

Ubibot insists on researching and developing self-owned patent products, including the external probes that match our sensing devices.

There are three types of probes that can match with the WS1 and WS1 Pro device. Here are the instructions of how to use them.

Using WS1 device:

This device supports DS18B20 probe. As it only has one USB port, only one probe can be connected. When using USB power at the same time, one USB splitter is needed. Connect the splitter to the device USB port, one female port is for power and the other is for data transmission.

Power Supply and Consumption

Excessive battery consumption usually happens when the device is exposed to liquids. 

It is likely a capacitor on the device is broken and has caused an internal electric leak. Your device can still work, but it will drain the batteries quickly, probably in a few days. A normal WS1 device on default settings with brand new batteries should last for 4-6 months. You can use an external 5V micro-usb as the power source rather than rely on the batteries.

You can use 5V / 2A USB power source to power the device. Meanwhile you can use AA batteries as backup.

Please note when you have just connected the micro-usb power to the device, the green light will start flashing as the device will be running the USB connection mode for the first 15 minutes, but your device should sense and sync normally. It will quit this mode automatically after 15 minutes. Please wait about 30-45 minutes for the device to leave the USB connection mode and equilibrate with its environment to have the best temperature accuracy.

The WS1 and WS1 Pro device can be powered both by AA alkaline batteries and rechargeable batteries. However, these Ubibot devices will not recharge rechargeable batteries.

The GS1 data logger has an embedded 2900 mAh lithium battery which can be recharged by type-C USB and DC 5V/12V charger.

The battery life can be affected by many factors.

The following examples are tested under default synchronisation and sampling settings. The WS1 and WS1 Pro are tested with VARTA industrial batteries.

Please note, stable network signal also helps saving power. The signal under which we tested was stable -60dbm.

The table below shows the estimate battery life of the data loggers:

Device

Battery life

WS1-A

4-6 months

WS1 Pro WiFi only

8-12 months

WS1 Pro 4G (sync via SIM only

1-2 months

GS1 – A

4-6 months

GS1 – AL4G1RS(sync via SIM only)

3-6 weeks

GS1 – AETH1RS (WiFi+RJ45)

3-5 days

GS2 – EL

8-12 months

GS2 – EL4G

3-6 weeks

The battery life changes accordingly with the synchronisation and the sampling frequencies. The shorter the sync interval is, the shorter the battery life becomes, vice versa.

Data Synchronization, Connection and Alters

Please check the following if you encounter this:

1. Check whether you have activated the “positioning function” in your phone. Turn it on, if it is not activated. Typically, a power-on notification will appear when you tap the Setup button.

2. Please confirm if you have VPN installed on your phone. Some settings of the VPN app may conflict with Ubibot app or forbid it’s permission to access to WiFi information. Please switch off the VPN app and try again.

3. There may be a problem with your version of iOS. Please contact the UbiBot Canada support team for detailed instructions. Support email: info@ubibotcanada.ca.

Please make sure that your WiFi router has a working network connection using other devices. If the network is working properly, please check the following:

  1. Is your router’s WiFi SSID hidden? If not, check that you have the correct frequency and channel. The WS1 can only be connected to 2.4 GHz networks (802.11 b / g / n), channels 1-13. Please note that 5 GHz WLAN is NOT supported. If you are using a mixed 2.4 / 5 GHz network, make sure your mobile device is connected to a 2.4 GHz network at the beginning of the setup process. For detailed requirements for setting up WiFi, see this link.
  2. WLAN security type: The WS1 supports the types OPEN, WEP or WPA / WPA2. 
  3. WLAN channel width: Make sure that it is set to 20 MHz or “Auto”. 
  4. WiFi Password: Go through the WiFi setup again and make sure you have set the correct WiFi password for the network. If your WiFi password has changed, you will have to perform the WiFi setup again. 
  5. Does your WiFi need any s additional login procedure to access the Internet after connecting? If so, the device will not work on this network. 
  6. Battery problems: The WiFi connection uses a lot of power. Your device may be able to turn on, but it may not have enough power to connect to WiFi. Try replacing the batteries.
  7. Power-saving routers: Your WiFi router may be set to low power or network connection on demand. Some routers do this to save power or to avoid interference. You may need to boost the power of your WiFi router, or move the device closer to the router.
  8. Interference: Interference from electrical or electronic devices in the area can cause transmission problems. This may be more prevalent in some industrial settings. 
  9. WiFi interference. If there are too many other WiFi networks in the vicinity using the same channel, you won’t get a good connection. Consider changing to a different channel to avoid interference. Remember, even if the device can’t connect to WiFi, it will continue to take measurements and store these internally. 
  10. Signal strength. Check you are in range for your WiFi, or if using mobile data, make sure you have a good signal. 

By default your device will take readings every 5 minutes and will sync with the IoT Platform every 15 minutes. The measurement and data sync frequency can be changed under the device Settings tab in the App. Remember, the more frequently it syncs, the shorter your battery life. If the frequency is set too high, the frequent WiFi usage may increase the internal temperature of the device, in which case the measured temperature may be inaccurate.

Therefore, we recommend to set the sync frequency to a value higher than 10 minutes and the measurement frequency to the same or shorter interval than the data sync.

  1. Check that the device is powered on. Press the button and listen for a beep. This will make the device manually sync the data. If the indicator flashes green then the sync is working. If it flashes red once then there is another problem. Try the next steps.


  1. Check that the device has sufficient battery power for the WiFi to work. WiFi takes a lot of power — the device may be on, but unable to connect to the WiFi.


  1. Make sure your device’s WiFi router has a working Internet connection (e.g. try to access ubibot.comusing a mobile connected to the same WiFi). Without an Internet connection, the device won’t be able to connect to the IoT platform.


  1. Check that the WiFi connection is working properly, if need be, go through the WiFi setup again.

The default settings of all Ubibot data loggers allow the device to take sensor readings every 5 minutes and to sync these readings with the IoT Platform every 15 minutes.

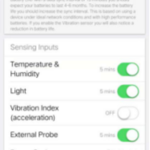
The measurement and data sync frequency can be changed under the device Settings tab in the App. Tap next to any sensor entry to bring up a popup. This gives some standard intervals, or you can use the custom field to set the interval according your requirements. The minimum interval is 1 minute. You can also enable or disable each sensor on this screen.

Remember to enable any sensors you need to use, especially the external probe. Many customers forget to turn on the External Probe button, so they see no data in the readings.

The data sync interval can be set in a similar manner.

Please note, the more frequently it syncs, the shorter the battery life is, and the more frequently the sensor readings, the more quickly you will use up the internal memory. If the frequency is set too high, the frequent WiFi usage may increase the internal temperature of the device, in which case the measured temperature may be inaccurate. Therefore, we recommend to set the sync frequency to a value higher than 10 minutes.

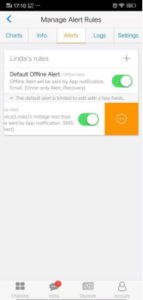
You can manage your alerts in the Alerts page in the App.

Tap on the “+” to add a new alert. If you want to delete any alerts, just drag it to the left and tap the orange “-” that appears next to the alert.

NOTE: The “Default Offline Alert” can only be turned off. It cannot be deleted.

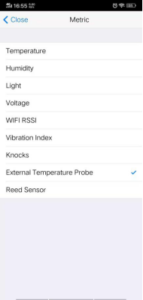
Alert Metric: You can set alerts for any of the metrics shown below. The voltage indicates the remaining battery in the device. Typically, when this drops below 2.6v, it’s not able to support WiFi and hence data sync, alerts and wireless setup won’t work.

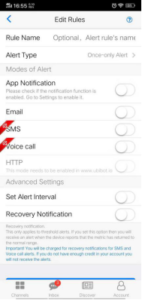
Modes of Alerts: We offer multiple channels to send alerts, including in-App notifications, emails, SMS texts, voice call and web notifications. You can configure any combination of these via the UbiBot ® App or using the IoT portal.

Please note that the SMS and voice call alerts will cost you credits from your balance. The precise fee depends on the network provider of the receiving number. This cost can be checked when you set up the alerts or on our pricing page.